最近做一个微信小程序的时候因为要求所有请求都得是https的连接,服务器端https 倒是搭建好了,可本地测试没法进行啊,于是只能自己在本地搭建个https的服务。
步骤很少,和把大象放进冰箱需要的步骤一样!只需要三步:
第一步:要使用ssl,肯定需要生成证书,这里我就生成的自签名证书
第二部:安装nginx和配置ssl
第三部:用nginx反向代理到node服务端口
证书生成
安装Openssl
下载地址:http://slproweb.com/products/Win32OpenSSL.html
(根据系统选择32位或者64位版本下载安装)。下载完成后,进行安装,默认安装在 C:\OpenSSL-Win64文件夹中。
- 配置环境变量。在环境变量中添加环境变量Path :C:\OpenSSL-Win64\bin;
自签名证书生成
1
2
3
4
5
6
7
8
9
10
11
12
13
> cd c:\ssl
// 设置变量
> set OPENSSL_CONF=C:\OpenSSL-Win64\bin\openssl.cfg
> echo %OPENSSL_CONF%
//生成server.key
> >openssl genrsa -out server.key 4096
//生成request文件
> openssl req -new -key server.key -out server.csr
//获取私钥
> openssl x509 -req -days 730 -in server.csr -signkey server.key -out server.crt
其中,server.crt就是我们的证书,server.key就是私钥。
注意一定要设置变量OPENSSL_CONF不然会有以下错误
1 | c:\OpenSSL-Win64\bin>openssl req -new -key server.key -out server.csr |
完整过程如下:
1 | D:\ssl>openssl genrsa -out server.key 4096 |
nginx 搭建
下载安装
从官网下载nginx 最新稳定版Stable version (非常的小,只有不到2M,我的版本号是1.12.2) http://nginx.org/en/download.html
然后根据官方文档提示解压安装1
2
3
4cd c:\
// unzip nginx-1.12.2.zip (可以手动解压)
cd nginx-1.12.2
start nginx
检测是否启动成功1
2
3
4
5
6C:\nginx-1.12.2>tasklist /fi "imagename eq nginx.exe"
Image Name PID Session Name Session# Mem Usage
=============== ======== ============== ========== ============
nginx.exe 652 Console 0 2 780 K
nginx.exe 1332 Console 0 3 112 K
有两个进程,说明启动成功,一个进程是nginx的主进程,另一个是工作进程。
这里提一点
解压完成后,最好是不要去直接点击nginx.exe文件安装,我就被坑过,解压完成后直接点击,当时什么也没发生,只有窗体闪烁了一下。等到cmd执行start nginx时,怎么都启动不起来。后来执行nginx -s reload后就对了。原因据说是双击运行程序会改变配置文件nginx.conf,所以需要reload。
当nginx启动后,正常情况下,访问localhost应该可以的,会有nginx欢迎页面,如果没有,检查是不是IIS服务器没关,因为IIS会有可能把80端口占用
配置SSL
此时nginx只支持http,所以需要把刚才生成的自签名证书配置到nginx里,找到配置文件”C:\nginx-1.12.2\conf\nginx.conf”,然后取消下面注释并配置路径1
2
3
4
5
6
7
8
9
10
11
12
13
14
15
16
17
18server {
listen 443 ssl;
server_name localhost;
ssl_certificate D:\ssl\server.crt;
ssl_certificate_key D:\ssl\server.key;
ssl_session_cache shared:SSL:1m;
ssl_session_timeout 5m;
ssl_ciphers HIGH:!aNULL:!MD5;
ssl_prefer_server_ciphers on;
location / {
root html;
index index.html index.htm;
}
}
访问https://localhost就应该可以看到https安全提醒,选择继续就可以得到如下结果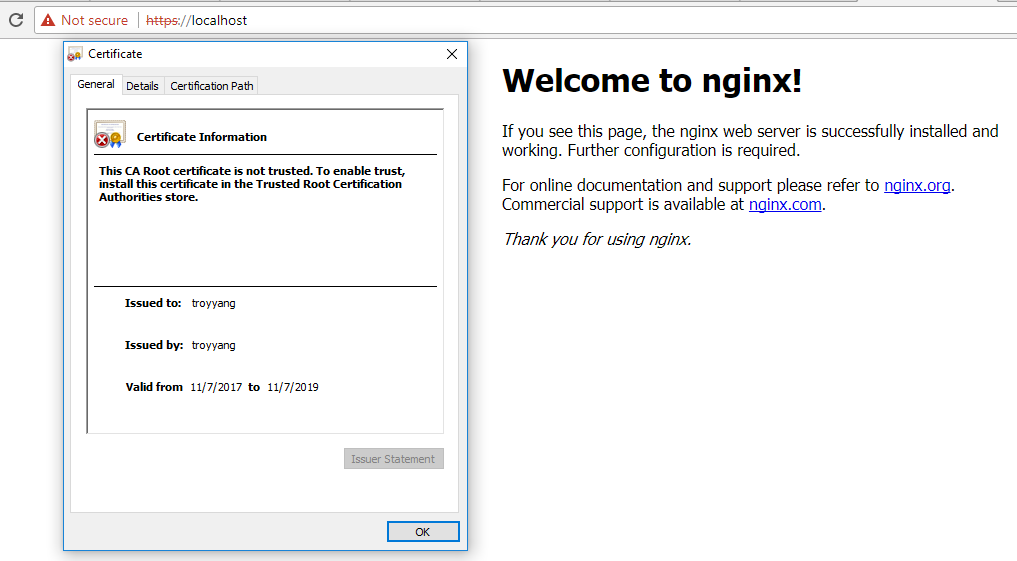
反向代理Node 服务
使用express创建个最简单node服务器,端口为3000
app.js1
2
3
4
5
6const express = require('express')
const app = express()
app.get('/', (req, res) => res.send('Hello World!'))
app.listen(3000, () => console.log('Example app listening on port 3000!'))
运行服务并确保localhost:3000能访问到。1
node app.js
Nginx 反向代理配置
找到上述Nginx配置文件,将443的server location 改为下面部分:1
2
3
4
5
6
7
8
9
10
11
12
13
14
15
16
17 server {
listen 443 ssl;
server_name localhost;
ssl_certificate D:\ssl\server.crt;
ssl_certificate_key D:\ssl\server.key;
ssl_session_cache shared:SSL:1m;
ssl_session_timeout 5m;
ssl_ciphers HIGH:!aNULL:!MD5;
ssl_prefer_server_ciphers on;
location / {
proxy_pass http://localhost:3000;
}
}
如果一切OK,访问https://localhost 会得到hello world的输出。至此,一个在windows平台上使用ssl + node + nginx的服务就搭建好了。
参考:
https://stackoverflow.com/questions/7360602/openssl-and-error-in-reading-openssl-conf-file
https://blog.didierstevens.com/2015/03/30/howto-make-your-own-cert-with-openssl-on-windows/


